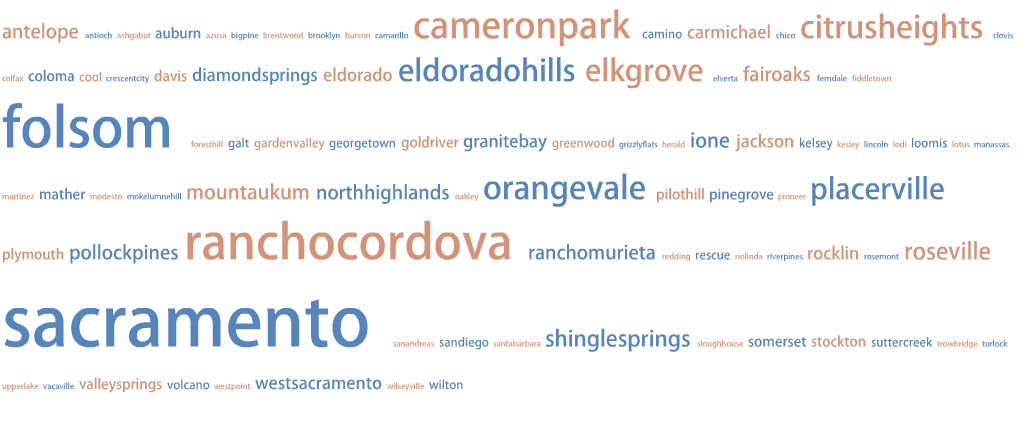
Click the image to see a larger version. Data include classes designated “Online,” as well as those designated iTV. N=414 (students). Largest number of students (226) report Sacramento zip codes.
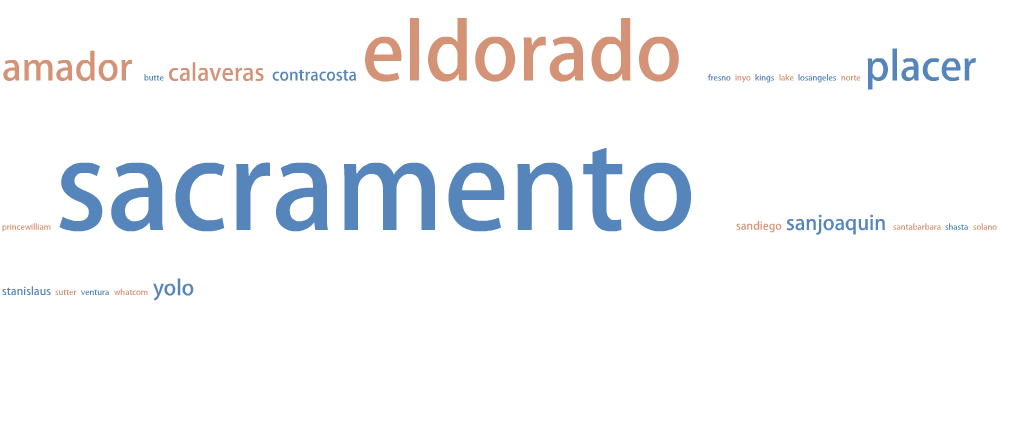
Here’s the view by county.

Click the image to see a larger version. Data include classes designated “Online,” as well as those designated iTV. N=414 (students). Largest number of students (226) report Sacramento zip codes.
Here’s the view by county.
Below is a new page that tracks known issues with Desire2Learn at Los Rios:
https://sites.google.com/a/apps.losrios.edu/d2lknownissues/
If you or your students are having a problem with the LMS, this is another place to check to determine whether the issue is known, and perhaps most importantly, which browsers are implicated.
Modified the original design a bit, moving up to 2″ aluminum bar stock for the cross, to allow for the camera to hang on the same plane as the balloon string.
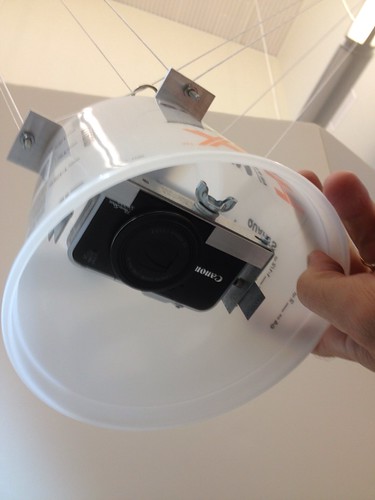
I also added a bucket, which I’ll foam up in an attempt to protect the camera in a bombs away scenario. 2 and a half quarts of security theater!
Update: I walked over to Printing Services and weighed the picavet rig with camera in place. 1 lb, 3.2 ounces. Given the helium shortage, we’re looking into kites as an alternative, and the rig weight will inform the kite selection process.
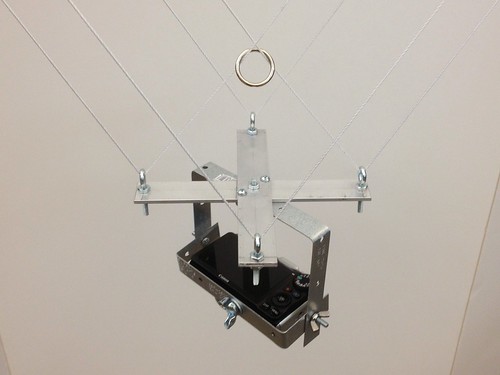
Finished the camera frame and the suspension business, and got the thing strung up. I need to make some adjustments, and I think I strung it a bit wonky, but it works and auto levels!
In preparation for some weather balloon flights, we’re working on building up a picavet, which will keep the camera level and steady regardless of the angle of the string – you can read all about them here: http://www.kaper.us/basics/BASICS_picavet.html
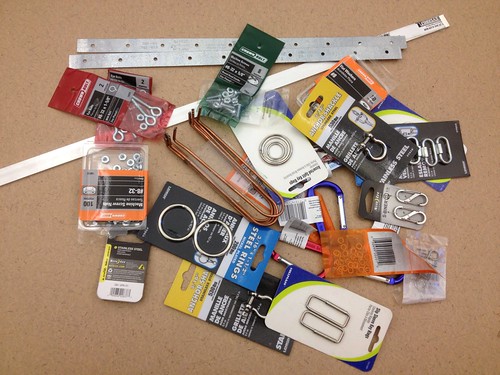
After a couple of hours at the local hardware store, I ended up with a big pile of little parts.
I set to work this morning, and was able to knock out the basic framework for the part that attaches to the kite/balloon string:

Lots of guidance on the web – I drew inspiration from http://www.arch.ced.berkeley.edu/kap/equip/picavet.html#no3.
Next is the camera mount, which attaches to the suspension frame pictured above. We hope to test it out next week, and to tweak and adapt in advance of a project that will see students doing some aerial and ground surveying of a local nature area.
Q: What’s different in D2L v10.1?
A: There are some nice interface changes – dropdown menus where there used to be lots of clicks, drag-and-drop in a lot of places – that will make managing things easier. The changes you’ll notice most are in Content, but if you’re used to D2L, it will only take you a little bit of time to get used to v10. In any case, most of the minor process changes happen when you’re creating content, so if you already have content that you want to copy into a new course from the prior semester, you won’t notice much at all. For additional details about the changes, check out this handy guide put together by Jory Hadsell at SCC: http://media.scc.losrios.edu/d2l/v10/index.html
Q: How much work will I have to do to get my D2L course sites looking the way I like them to look?
A: That depends. If you’ve done a bunch of custom homepage work, a fair amount. If you use the stock template, not much at all. Whenever there is a system update, you can expect some amount of work to get things in order. If you’re looking for the FLC News, Twitter or Contact widgets, they can be found in Edit Course -> Widgets – feel free to customize a homepage and add these.
Q: Why is the stock template so _____________ (plain, ordinary, boring, colorless, etc.)?
A: Clean, functional design wins over fancy any day of the week, especially in terms of accessibility and mobile devices. You can create a custom Homepage if you want to fancy things up via Edit Course -> Homepages. You can customize the Navbar and Theme as well via Edit Course. Simply make a copy of “FLC v10 Navbar” or “FLC v10 Theme,” make your changes, and make your new, perfected Navbar or Theme active. With enough tweaking, it’s possible to make a D2L course shell look like anything but a D2L course shell. Realize, however, that our students are often enrolled in multiple courses that use D2L, not only at FLC, but at our sister colleges as well. As such, they sort of expect things to be in more or less the same places.
Q: Why are there only two columns, with News on the left?
A: We’ve learned that this works best for screen readers like JAWS, a program that helps students with disabilities successfully interact with D2L. See above for details on changing the stock template if you’d prefer a different layout.
Q: I’m confused and I need help. What do I do?
A: You can check out various self-help materials (above) and here, or send Zack an email and he’ll help you out, though after this week, he will be out of the office until August. We’re working on a plan to have some peer support opportunities during FLEX, and there will be plenty of opportunities to get a handle on things early in the Fall 2013 semester. Stay tuned, smile, and breathe! 🙂
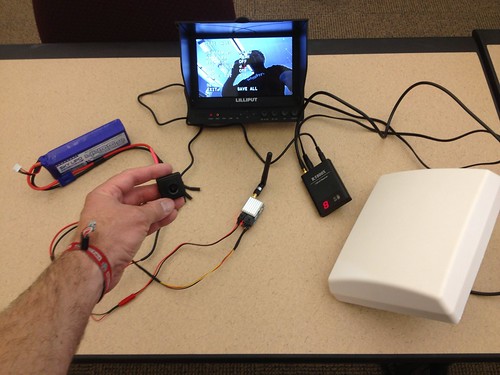
Spent some time in the workshop today in between meetings, and finally got the POV camera powered up and working. I fashioned a little custom wiring harness using JST connectors for power, reconfigured the A/V cable that came with the transmitter, and powered up the system. Behold – video! From left to right: LiPo battery (in this case powering Tx and Rx), camera, battery powered field monitor, transmitter (this and the camera will be housed on the quadcopter), receiver, and antenna.
In other news, the HoverFly Pro (a version of the flight control board that has some useful features, including auto level) arrived as well, so I’m working on upgrading the quadcopter with that and the POV video system. I hope to be flying again – and exploring local lakes with the OpenROV – in the next couple of weeks!
I know what I’ll be doing for the next little while…

Though it can at times be overwhelming, one of my favorite things about working on a complex project is the vast number of things – some small, some large – that one has to learn to make it all work. For this phase of the project, we procured a plant stress camera, which is destined for the ArduPlane and perhaps the quadcopters as well.
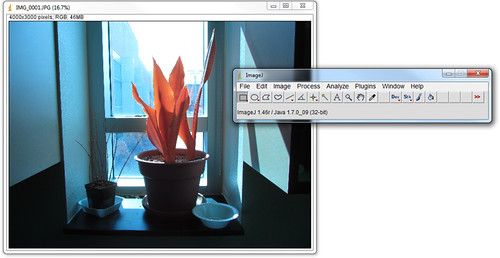
The camera – a Canon SX230 HS modified by LDP LLC/MaxMax.com – arrived recently, and I fired it up today to take some pictures of plants. I’ve also been reading up on ImageJ, a public domain, Java-based image processing program developed by the National Institutes of Health here in these United States. I don’t know much about it yet, but the software is extensible via plugins and macros, and the vendor provided various macros to convert RGB images into color scaled Enhanced Normalized Difference Vegetation Index images, or ENDVI.
The camera also needs to be updated with the Canon Hack Development Kit (CHDK), custom firmware that enables, among other things timed, continuous shooting, which is critical for our purposes. I’ll be updating the camera with that just as soon as I can read up on it. Onward!
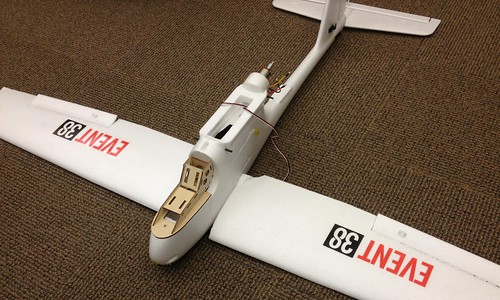
The RTF382 from Event38, soon to be flying under the command of the ArduPilot Mega autopilot. Stay tuned.